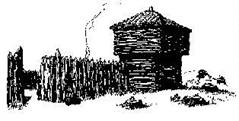
Footsteps of our Forefathers![]()
|
||||||
|
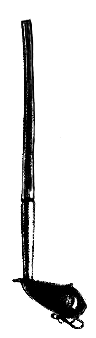
A while back I became aware of a new type of arrow quiver that intrigued me. I have, for years, had a love/hate relationship with the various quivers used by archers around the world and spanning centuries. If you have been an archer for any time at all, especially if you have gone roving and stump-shooting, you probably have had the occasional spill of arrows when you have bent over to study a track, or retrieve an arrow from a stump, or simply ducked under an overhanging tree limb or bush. I have both bought and built roundish quivers that hang on your back. Some had one strap, some two, and some even had a strap that went across your chest to connect the two shoulder straps. All of them were prone to dumping a shower of arrows over my head when I unwisely bent over. I tried making an oval shaped quiver of softer leather like Howard Hill was often photographed wearing. Supposedly it would bend with your back and keep the arrows trapped. I had some success with it but it was not perfect. So, I made a quiver that was sort of wallet shaped. Being flatter it could better trap the arrows and being of soft latigo it pinched the arrows fairly tightly, but it, too, sometimes spilled the shafts when I was careless in my movements. I have used the quivers that have a sort of screen-door clasp on them for each arrow. They are made to wear on the hip like the movie-cowboy quick-draw rigs. The arrows are held by metal clips. I don’t like them. The feathered end of the arrows move back and forth with each step you take, and they get caught in the brush. Fred Asbel has made one of a better design that can be worn on the hip, over the shoulder, or under the arm. They are sold through his ads in the archery magazines. It works if you like that type of thing, and it is fairly inexpensive. But it is definitely not of our time period. I have even resorted to the medieval type of quiver that consists of merely a leather cup that is held to your belt by a strap. The arrows go under the belt with the pointy ends held in the cup. It is fairly functional but has many limitations, not the least of which is the small amount of shafts it will hold. So when I saw this new quiver I was interested. The ones I saw were being sold on eBay. They were sort of tear-drop profile and were open at the top and had a hole on the face near the bottom. They can be worn over the shoulder against the back sort of like a Glenn St. Charles or cat quiver style, but are easily moved to be cradled under the arm and an arrow drawn from the bottom hole. Like the St. Charles, (which is designed to allow the arrow to be drawn from behind the back at the bottom of the quiver) such a quiver reduces the amount of motion the drawing arm makes and thus is not so prone to be seen by game. But the cat quiver and the St. Charles can still result in dumping the arrows from the top. But if the new style quiver is carried under the arm when the archer is forced to bend over, the arrows are never dumped. I didn’t much care for the way the quiver on eBay is designed or put together. It is laced or sewn in such a fashion that it squeezes the two ends rather flat and protuberant. Also, the hole from which the arrow is extracted (unless it is drawn from the top) is a tad too small for my satisfaction. It puts too much drag on the shaft and impacts the fletching. So I set about making my own. To begin, I had to decide what size quiver I wanted. As a result, I ended up with two different sized quivers. I also wasn’t sure just how I wanted to make one: sewn or laced in the front, or put together with a seam down the back. I regret that I took no photographs of the making of the larger (and first built) of the two. But since there is little difference I believe the photos I did take will suffice. I do not give measurements because each person will have his own ideas of the size quiver he wants. The two I show here are six inches and three inches diameter respectively. The smaller is twenty-two inches long and the larger is twenty-three. That is long enough to protect the shafts but still leave the fletching above the leather quiver. I began with latigo leather I got from Fox Tannery in Salt Lake City, some rawhide, and a piece of soft "split" that Howdy Davis had given to me some time ago. I cut the corners of the latigo so that when I put it together for a seam it would not overlap on the edges. Being frugal with my rawhide was a mistake. I cut three inch strips that ran the length of the larger quiver, and four two inch strips for the smaller that I then glued in place spaced equal distance from top to bottom. I’d have better served to have just lined the entire quiver in both instances. This is what the beginning of the smaller project looked like:
|
Figuring that at some time or other I’d be carrying the quiver straight up on my back, on both of them I sewed on a single "D" ring at the top and two on the bottom so I could attach either one or two straps as the mood might strike me. I sewed or laced them on tightly, but still with enough give so they could swivel. I did this before I did any assembly so I only had one layer of leather to deal with. I used leather backing to keep them from pulling through. I didn’t like the looks of the way the larger quiver came out, so I did a finer but more labor intensive job on the smaller. As you can see, the larger quiver is laced instead of being sewn, and instead of a seam down the back, it is assembled by lacing the top and bottom above and below the "hole". Whether I lace or sew, any others that I make will be done this way. Sewing or lacing a seam down the back is a real job, at least for the smaller one. You just don’t have room in the tight diameter for your hands to fit. I think the sewed seam really looks neat, but by the time I was really into it I was frustrated enough that I didn’t do all that I had intended to. Had I lined the entire quiver, in both cases, I believe the result would have been straight, even, sides around the hole. The holes in these quivers are much longer than the ones I saw on eBay, and I think they work better. I did manage to put a double layer of rawhide in the bottom, topped those with some wool-on sheepskin and topped that with soft latigo. I tried some wool around the top edge to prevent arrow rattle but discovered that I didn’t need it. These are quiet quivers. Drawing them through the hole, point first, makes for a quiet draw with a minimum of noticeable motion. I have field tested these quivers and it took some experience before I got the hang of it. A time or two when bending to get under some of nature’s obstructions, I failed to adjust the quiver to the proper position and dumped the arrows. But once I became aware of what I was doing I did not have that problem. I suppose I have a dozen or so quivers hanging in the shop, each with a clutch of arrow shafts weighted to a different set of bows. When I go out now I use only this quiver. I take the small one if I’m going on a day shoot, and the larger one for when I think I might need more arrows. My other quivers are getting short shrift. While I am not entirely satisfied with the aesthetics of what I came out with, I think that with the addition of a full rawhide liner I could strengthen the sides to where they would not deform as these have. But for now, at least, I am satisfied. If you decide to make one of these and have problems with it, give me a call and I’ll try to help. But they are really quite simple to make and, happily, more functional than anything else I have tried. For the next issue I will try to have ready some patterns for field gear I make and use. I am especially fond of the arm guard. It can be made in any length but this one works for me. I do not need something especially long, because when the string occasionally hits me, it isn’t my arm that gets it, it is that juncture between the base of my thumb and my wrist. Since I have arthritis it really makes for a lot of pain. So I made an arm guard that also protects my thumb but doesn’t get in the way of mobility. The little wooden thing is a string wax container that I make. They get filled with my own formula of natural waxes that can be mixed for warm or cold weather. Makes for period gear that is even more effective than the stuff you can buy in the plastic tubes. And it’s biodegradable! Until the next time, shoot, shoot, shoot, as Howdy would say, and wax, wax, wax. _______________________
|
|||||
|
stories &
adventures pertaining to those than went before us.
Page 6 |
||||||

© Copyright 2005-08 "North American Frontiersmen". All Rights Reserved.
 See
your Elder/Staff writer's Bio in the Jan/Feb 07 issue of the North
American Frontiersmen's "Smoke Signals".
See
your Elder/Staff writer's Bio in the Jan/Feb 07 issue of the North
American Frontiersmen's "Smoke Signals".